
Sunday, November 28, 2010


Saturday, November 27, 2010
A bit late


Here it is -- just after Thanksgiving. And I'm finally updating this blog.
Such is what happens when you teach. But the bottom line is that the kitchen is done.
In September, the contact paper for the soffits went up with some difficulty. But it was easier than removing the wallpaper, repairing the walls, and then painting. The goal was to complete the kitchen efficiently as well as economically.
The metal tiles took longer than expected -- but they were done in a day. Metal tiles are so much easier to cut than ceramic. One doesn't need a tile saw! Or nippers!
The problem was the metal tile instructions said to use the included double-sided tape. In the last paragraph of the instructions, they talked about using ceramic mastic. I wish I had started out using the mastic. The tiles kept popping off. The double-sided tape did not hold that well.
In October, I used mastic to fix the tiles that came off. And all are now sticking.
The kitchen is finally done. It cost less than $2000 for the lighting ceiling, flooring, counter tops, and backsplash. And it held up well under the rigors of Thanksgiving.
Monday, August 9, 2010
The Costs
I ordered the contact paper for the soffits and the metal tiles for the backsplash. The total cost, including 10% figured for supplies and such, is just over $1700.
Friends came over yesterday and they thought I had real granite counters. They stayed at the house watching the critters, so they know the old look. The new look got their approval!
Sunday, August 8, 2010
The Ceiling


The kitchen looks so nice now.
I searched for black contact paper to use for the soffits. No one has it, so I'll be doing another online order. I also need to order the metal tiles for the backsplash. But once again, I am so pleased. And I can't believe how ugly the kitchen was before we did this work.
The cost right now is at about $1300. Not bad for a new sink, new counters, new flooring and a new ceiling.
Tuesday, August 3, 2010
The Ceiling Is Done
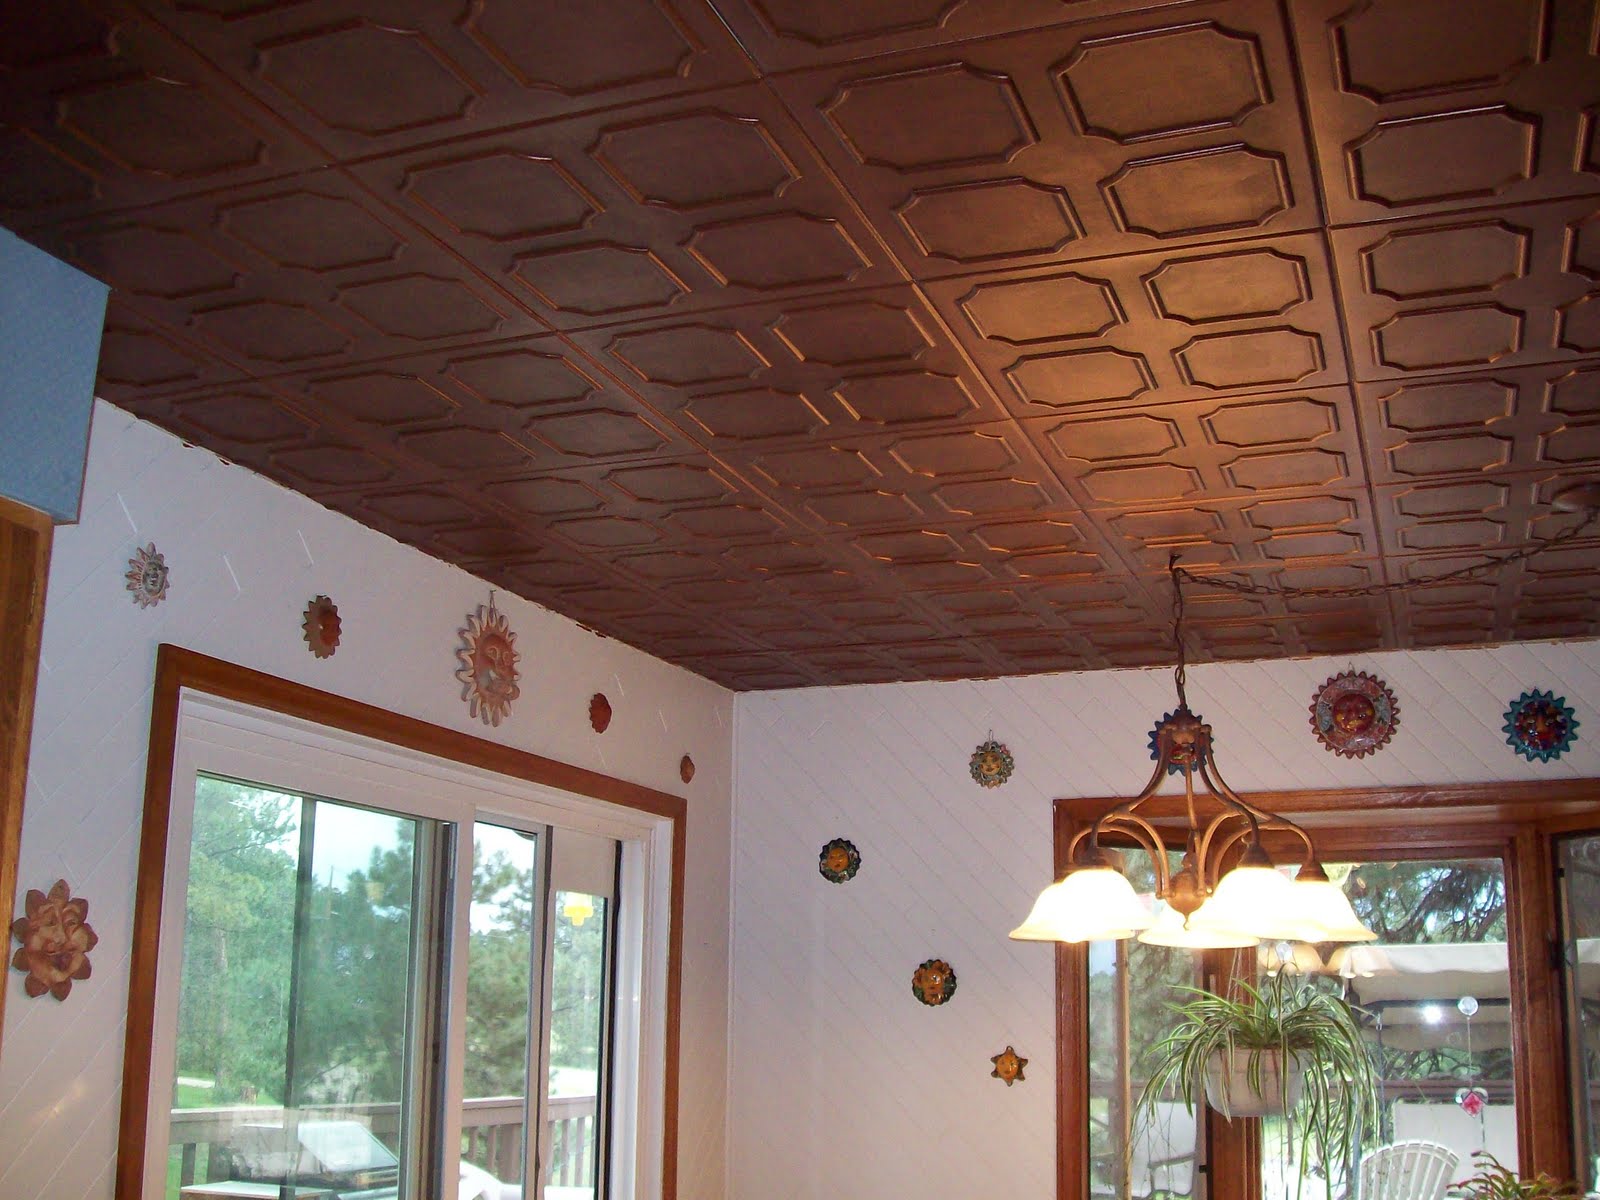
This is only a part of the ceiling. I am so pleased. Mark, who had a lot of doubts about this idea, is also pleased with how it looks. Next comes the backsplash and the soffits. My internal debate relates to the color for the soffits. Paint is out -- the soffitts have wallpaper and to do them right, I need to use an oil-base primer and oil-base paint. I am leaning towards Contact Paper. But the question is color. The major projects are done. I can wait a bit.
Saturday, July 31, 2010
Starting the ceiling


The ceiling tile arrived this past week, so I began to try and figure out out to arrange them. I had talked with a friend, Alan, about how to start them. He's done a lot of home restoration/remodeling. The instructions gave two ideas: find the middle of the room and start there or start at the corner farthest from the main entry. I thought the farthest corner would be fine and Alan concurred. But he said the corner had to be square.
I went to the corner with the carpenters square and found it was not square. I thought the quarter round used as crown molding may have been a problem, so I took it off.
I discovered the wallpaper on the ceiling wasn't as secure as I thought. The quarter round was holding it up! So after the quarter round was removed, I started taking off the wallpaper. This worked because I was a bit stymied as to how to end the tile where the dining area met the living room.
As I was peeling off wallpaper, I learned more about the house. At some point, the ceiling in the dining area was textured. But plaster was used to smooth it out so wallpaper could be put over it. And then when I got to peeling the wallpaper off the kitchen ceiling, I discovered even uglier wallpaper.
In the kitchen, the wallpaper was more securely attached. I stopped there.
But I went back to my corner with my trusty carpenters square, and it is not square. I will have to start in the middle of the ceiling, whereever that it!
This is such appropriate work to my teaching geometry this fall!
Saturday, July 24, 2010
The ceiling tiles are on their way

The ceiling tiles were ordered on Tuesday and are en route. The final choice comes from http://www.antiqueceilings.com/. The style and color are Alfa Antique Copper Chocolate.
In the meantime, since we were in a lull, we went to Arches National Park to camp and hike.
Monday, July 12, 2010


Saturday, July 10, 2010
Starting the floor

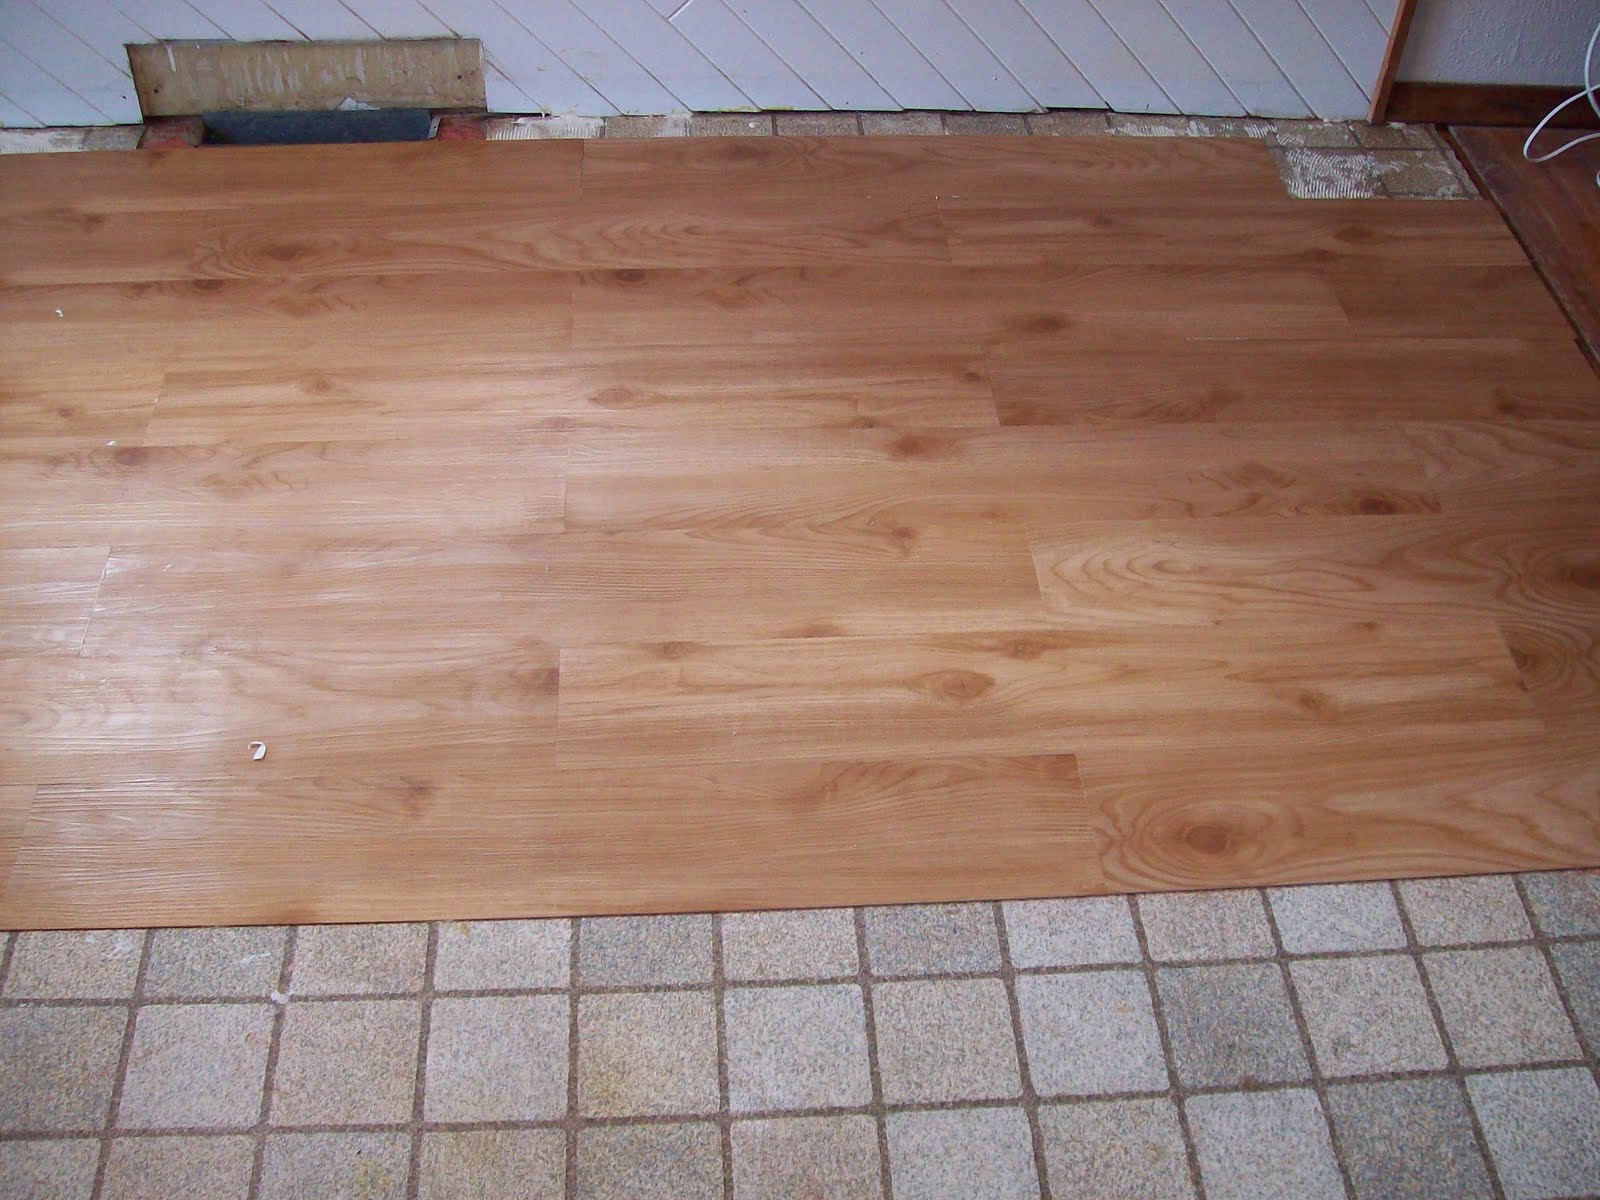
We started the floor today. I can't get over the difference in how it looks -- the dining area is done. We should finish tomorrow.
My frame for flooring is with putting in ceramic tiles. And I had the same mindset with these vinyl planks as far as the glue went. I started out going overboard. And glue got everywhere. We both swear it took our skin off as we kneeled on the floor. But I got better. No more excessive glue seeping up between the seams.
Mark did a great job making the cuts to go around corners and other such things you find in a kitchen.
We are wondering why this took us so long to do this. Why didn't we do this years ago? Oh well.
Friday, July 9, 2010
Chiseling
I am so wanting to get started on the floors. The patch is working well in front of the dishwasher. But we now have to solve the problem of running the coaxial cables and other such wires under a threshold.
Whoever put the floors in did not allow for expansion space between the hardwood floor of the living room and the kitchen floor. Both are at the same height. We need to get a threshold between the floors to help with the transition of styles.
I was hoping we could find a threshold with an open space on its bottom so we could put the cables and stuff under it. It does not exist.
Someone suggested to Mark that we create a space in the kitchen floor. I had hoped we could rent a router. No such luck. A flooring installer suggested scoring the floor with a circular saw and then chiseling out the space.
We aren't sure we can adjust our circular saw for that.
So now we are using a hammer and chisel to create the space where we can run the cables. And then I can start the floor!! I hope. I want a new floor.
Wednesday, July 7, 2010
Always get samples


My faux tin ceiling tile samples came today. And I am grateful I ordered samples because I am disappointed. The antique gold of two of them is way too dark. The color was far different from what I saw on the website. The website tile is on the right. I found another product today and am once again getting samples.
Tuesday, July 6, 2010
Digging out
Today was spent digging out the floor patch I had put on the floor in front of the dishwasher. I am going to lay one or two vinyl tiles in that area and then cover all of it with the faux wood vinyl planks.
I was sloppy with the floor patch because at that moment, I thought I'd be covering it with the luan. I had sandpaper, thinking I could use the electric sander it to level it out, but it wasn't working.
I am learning.
I hope to lay the vinyl tiles to build up to the level of the existing tiles. And then I'll use the vinyl planks on top of them. We will rent a 100-pound roller to go over the vinyl planks.
I'm so glad I have the summer off where I can run into a problem and not be stressed out about not meeting my deadline of having the floor done by now.
Sunday, July 4, 2010
What to do?
I went to Home Depot and Lowe's yesterday, all set to buy the luan and rent the stapler I needed to do the work.
Now I am even more confused. I did not know the staple gun needed an air compressor. So I went into the tools dept. to see if they had anything powerful enough to do the work.
An employee asked if I needed help. I told him what I was doing, and he said the staple gun that required an air compressor was the right tool. He brought me to a flooring guy. The flooring guy you can't put another layer of vinyl on two existing ones. I had to strip the top layer of vinyl and then put the luan down on that. He described the machine/tool I needed to rent to remove that layer.
I left and went to Lowe's. The flooring guy there was a former student! (I did not recognize him! He recognized me! But after he told me his last name, I remembered him. He was a good kid with great parents.) And he assured me that code allowed three layers of vinyl on a floor without using luan. I asked about his experience and he said he's been doing flooring since getting out of high school.
And then let's not forget Wade who told me I could put luan on top of the two layers of vinyl.
A friend suggested hiring a contractor. That's beginning to sound better and better. However, the budget may not allow for that.
We're now thinking of just putting the vinyl over the existing vinyl and then change things in the future. It can't be any worse than what we have right now, right? Plus these vinyl slabs were such a great deal.
Friday, July 2, 2010
Setback
I was cleaning more of the kitchen floor, specifically the area in front of the dishwasher where the vinyl was coming up due to a flood from a previous owner. Our flood may have worsened it, but that vinyl's been working its way off for quite a while. And it hit me -- we have two layers of vinyl on this floor. Everything I've read says you should not add a third layer of vinyl to vinyl.
I had already sent email to Lumber Liquidators with questions about the vinyl coming up and had received an answer from Wade. In his email, he advised that we should put luan down over the existing vinyl. I felt the need to talk to him after the latest discovery and was pleased they put me through.
The goal is now to head out to Home Depot and get luan to put over the vinyl. It won't raise the floor as much as ceramic tile would have. Ceramic tile would have required a cement backer board and then you have the tile on top of that.
Another setback are the ceiling tiles. My samples should be here on Tuesday.
Tuesday, June 29, 2010
The Costs So Far
The total costs to date:
Paint: Kilz (recommended by Consumers Reports) $30.00
Painting stuff $20.00
Flooring $174.26
Giani countertop paint $103.12
Complete Franke sink and faucet from Lowes $261.25
Plumber $378.75
Ceiling tile samples (where are they?) $25.00
Total: $992.38
Starting the floors


Yesterday, I pulled off all the molding and quarter rounds and didn't break a single one! I can reuse them! But I was totally grossed out by the amount of dirt they were hiding. Today, I cleaned those areas because I want the new faux wood slats to stick down well. And I want the area to have a clean look even though this area will be covered.
I did identify where I took the molding and quarter rounds from so we can put them back.
Mark has to pull the nails from the molding because I want to clean them off, too.
In cleaning parts of the floor today with a scrub brush, I learned why I will have to be gentle on the new counters. I did spill paint on the floor (which is why I love putting in new floors after I paint!) I had to scrub, but the counter top paint came off the floor. Giani recommends using only a dish cloth with antibacterial soap to clean the counters. I can live with that.
Above are my before photos of the floor. In my up-close and personal view of the flooring today, it is worn. There are cracks in it. This is the advantage of having mottled-looking linoleum -- the wear-and-tear gets hidden in the patterns and colors.
Sunday, June 27, 2010
Another View


This is a before and after photo from about the same perspective. The more I look at this counter, the happier I get. I got this new look by spending $100.
Saturday, June 26, 2010


The kitchen counters are done. I was hit by moments of perfectionism while I was painting. But now that they're done, I can't believe the difference in the kitchen. I am so pleased.
The steps with the Giani were to clean the counters with a degreaser and then paint with the black primer. You wait for 6 hours and then you put the "minerals" on, using the spiny part of a faux natural sponge. You then wait another two hours to put the top coat on. Two coats of topcoat are needed.
Wednesday, June 23, 2010
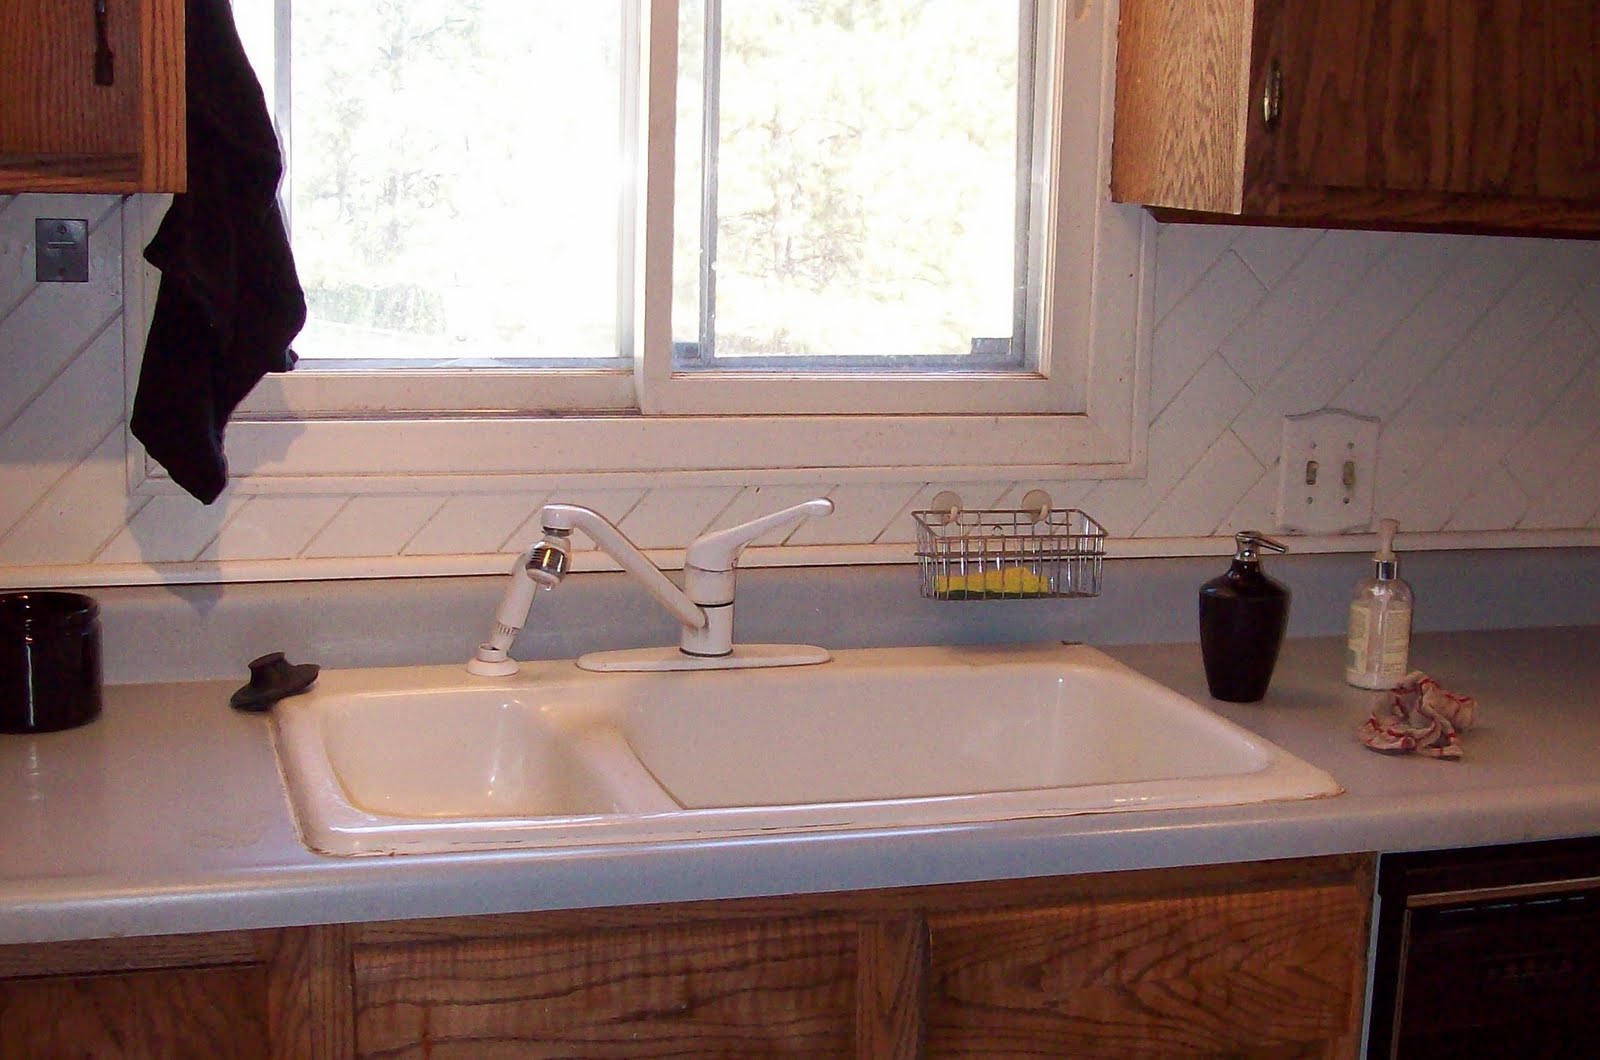
The Sink


After painting came the sink. The old sink was a cast iron Kohler that showed major chips and was a pain to clean. Because the plumbing was set for it, I searched for a perfect match so we could make it an easy swap.
Yeah, right.
Although it was a standard 33" x 22" sink, it was offset. The left bowl was smaller and shallower than the right bowl. The right bowl was nine inches deep. The left bowl, 5 inches.
I played with a lot of sinks. The acrylic sinks look beautiful, but then I heard there were issues if you put a hot pot in it. There are times when I will take a pot from the stove and set it in my sink. Acrylic was out.
The composite granite sinks are gorgeous, but at that time I was searching for the perfect match. Composite granite sinks were in the $250 range but required a separate faucet. Cast iron was out.
I kept coming back to stainless steel. The Kohler Toccata was an almost perfect match, but it would have to be special ordered.
One day at Lowe's, we found a ready-to-install sink and faucet package from Franke. Together, they were less than the Toccata. We purchased the Franke.
We called our plumber. Yes, we've done plumbing in the past, but this kitchen sink seemed daunting. These are the times when you need an expert.
And the expert saved us. The original plumbing for the sink, garbage disposal and dishwasher was a Rube Goldberg design (for those of you unfamiliar with Rube Goldberg, http://www.rubegoldberg.com/ .) I wish I had taken a photo of it. The drain pipe had actually fallen away once as the dishwasher was draining, creating a flood in the kitchen which then seeped downstairs into my husband's office. Because the drain pipe would often slip down, we propped a box under it.
Our plumber, Keith, noted other issues. The opening for the sink was not centered for either the window or the cabinet under it. Someone simply cut a hole in the formica and didn't seem to care where it ended up. And although this sink matched the outside measurements of the cast iron one, the opening created issues for clipping the sink in correctly. Keith solved the problem with a piece of plywood.
The sink and faucet cost $229.00 and included a faucet. The plumber cost $350.00.
But the new sink does look beautiful. I was amazed at how it made a difference in the kitchen's appearance -- even with counters that are still blue. And the plumbing is now trustworthy as well.
So far, new sink and new paint. Next step is to turn my blue formica counters into faux granite formica counters.
But it already looks so much better!
Let the games begin


 Since we bought this house, I have despised the kitchen. But I've lived with it. A previous owner was into Country French. We were able to remove blue rug (and expose a gorgeous wood floor,) the flowery drapes, valances and such in other rooms of the house. But the kitchen was a challenge.
The kitchen has blue formica countertops that are a bit worse for wear. Someone paneled the walls with diagonal slats of wood and then painted them white. These white panels also make up the backsplash.
The floor is wall-to-wall linoleum or vinyl or whatever that stuff is called. It is beige and blue. Someone in this house loved blue. It is coming up at the seam in front of the dishwasher.
The ceiling is the piece-de-resistance -- a beigey wallpaper with blue borders that feature pink flowers. I don't do flowery wallpaper, especially flowery wallpaper that's on my ceiling. But I've been at a loss as to how to fix that.
Last fall, I took out a student loan for graduate school. It was for more than I needed for school. My plan was to use that money this summer to redo my kitchen. However, my husband lost his job. I am realizing that I can't replace the countertops. I can't have someone come in and redo my floors as I originally hoped. But I am so sick of this kitchen.
I bought the dining room chandelier two years ago from Habitat for Humanity. It replaced a bright gold-toned chandelier. The ceiling lights in the kitchen were bought and installed last year. They replaced two boxed neon lights that dropped from the ceiling.
The goal is to change this kitchen but do it as inexpensively as possible and do as much of the work ourselves as possible.
The theme is faux because I found a product, Giani Granite Paint, to change my blue countertops so they look like granite. I found another product made from plastic that will make ceiling look like it is a tin ceiling. I am hoping that black metal tiles will work for the backsplash. And we're going to put vinyl wood slats on the floor.
Since we bought this house, I have despised the kitchen. But I've lived with it. A previous owner was into Country French. We were able to remove blue rug (and expose a gorgeous wood floor,) the flowery drapes, valances and such in other rooms of the house. But the kitchen was a challenge.
The kitchen has blue formica countertops that are a bit worse for wear. Someone paneled the walls with diagonal slats of wood and then painted them white. These white panels also make up the backsplash.
The floor is wall-to-wall linoleum or vinyl or whatever that stuff is called. It is beige and blue. Someone in this house loved blue. It is coming up at the seam in front of the dishwasher.
The ceiling is the piece-de-resistance -- a beigey wallpaper with blue borders that feature pink flowers. I don't do flowery wallpaper, especially flowery wallpaper that's on my ceiling. But I've been at a loss as to how to fix that.
Last fall, I took out a student loan for graduate school. It was for more than I needed for school. My plan was to use that money this summer to redo my kitchen. However, my husband lost his job. I am realizing that I can't replace the countertops. I can't have someone come in and redo my floors as I originally hoped. But I am so sick of this kitchen.
I bought the dining room chandelier two years ago from Habitat for Humanity. It replaced a bright gold-toned chandelier. The ceiling lights in the kitchen were bought and installed last year. They replaced two boxed neon lights that dropped from the ceiling.
The goal is to change this kitchen but do it as inexpensively as possible and do as much of the work ourselves as possible.
The theme is faux because I found a product, Giani Granite Paint, to change my blue countertops so they look like granite. I found another product made from plastic that will make ceiling look like it is a tin ceiling. I am hoping that black metal tiles will work for the backsplash. And we're going to put vinyl wood slats on the floor.
Subscribe to:
Comments (Atom)